Casting inspection is a critical process in the manufacturing of metal components. It is the process of examining metal castings for defects and irregularities to ensure that they meet the required standards.
This is a vital step in the manufacturing process as it ensures quality casting, and the metal casting will perform as intended. Metal casting inspection methods include physical inspection, composition analysis, evaluation of mechanical properties, and other inspection techniques.
An inspection report will be provided, including recommendations for improvement. Foundry workers can use this report in changing casting processes to ensure that the products are produced with the highest quality.
Metal Casting Inspection Methods
The casting inspection method that will be used will depend on the type of casting being produced. These can be non destructive testing and destructive testing. You can find the most common casting inspection methods used by casting companies here.
Destructive Testing
Like all manufacturing plants, foundries separate a few samples of every production run that will undergo inspection. All finished castings are will be cut to be inspected for their properties. Porosity and shrinkage are tested on the sample castings.
A single casting cannot guarantee the quality of all the castings in a production run, but it will determine if the casting process is standard.
The addition of radiographic inspection and ultrasonic testing can also be used in determining the quality of the metal casting.
Radiographic Testing and Ultrasonic Testing

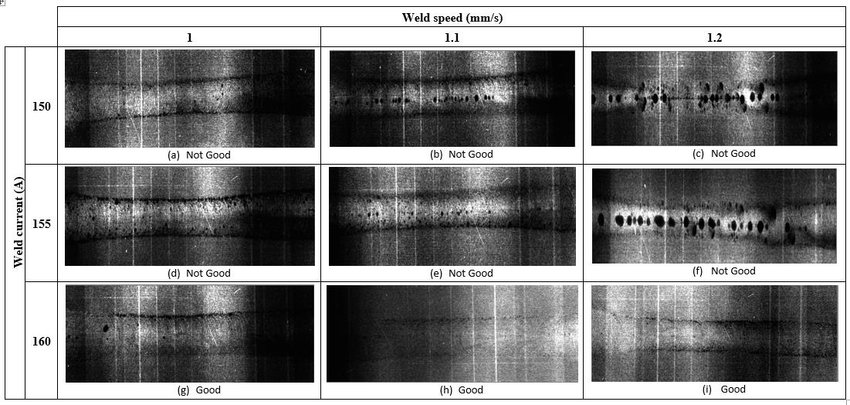
In radiographic testing, the inspection works like an x ray. A radiographic film will produce an x ray image of the castings. Dark spots will be displayed in areas where there are cavities or small damages caused by heat treatment.
If the radiographic inspection works like an x ray, the ultrasonic testing works by listening to the casting soundness. By listening to the sound product, inspectors can identify the thickness of the metal casting and the minor alloying elements.
Ultrasonic testing is used to detect any internal defects in the castings. This method involves sending high-frequency sound waves through the castings and measuring the time it takes for the sound waves to return. The time it takes for the sound waves to return is used to detect any internal defects.
Both of these non destructive testing methods require special skills. A specific casting surface is also required in ultrasonic inspection for accurate results.
Chemical Analysis of Composition
Another non destructive test is analyzing the chemicals present in the composition of the molten metal. A small amount of molten metal is tested to identify if there are alloying elements needed to achieve the appropriate chemical composition. Any changes in an alloy’s chemical composition can change its functionality.
The chemical analysis is done by pouring a small amount of molten metal and is casted on a special mold. The sample casting is evaluated by using a spectrometer. Once the result of the chemical analysis is approved, the full production of the metal casting can proceed.
Visual Inspection
Visual inspection is by far the most direct non destructive testing. Quality control personnel will inspect the whole casting to make sure that there are no visible defects or distortions. Quality control inspectors look for cracks, check for porosity, and other surface finish irregularities.
The results of the inspection are documented, which can be used as a future reference for process improvements.
Dimensional Inspection

Dimensional inspection is used to ensure that the castings meet the required dimensions. This method involves measuring the final dimensions of the castings using precision measuring instruments such as calipers and micrometers.
A coordinate measuring machine is one of the measuring tools that is used for expensive projects and metal castings that has a high requirement for specifications. The coordinate measuring machine is one of the most accurate measuring tools available today.
Mechanical Testing
Aside from the physical properties seen from visual inspection, mechanical properties are also tested to ensure that the casting is finished with the specified mechanical requirements. The mechanical properties are tested by tensile testing, service load testing, and hardness numbers are identified.
The ultimate tensile strength is identified by destroying the metal casting. For the service load testing, the metal parts are hydraulically tested to identify the load they can bear before they can get destroyed.
As for obtaining the hardness numbers, it is non destructive method that identifies the casting’s wear resistance.
Magnetic Particle Inspection
Magnetic particle inspection is used in non ferrous metals to inspect for holes and small cracks. These can be identified by dusting magnetic powder on the metal castings to search for metal distortions.
Liquid Dye Inspection
Also known as Liquid Penetrate Inspection, this method is used to find defects that are difficult for the naked eye to see. A penetrant solution is used, which comes in a brightly dyed oil.
The liquid dye stays on the invisible cracks and makes the defects of the metal casting visible. In this way, the defects can be repaired easily.
Casting Defects That You Can Find During Inspection
Casting defects are imperfections that occur during the casting process, resulting in a finished product that is not up to the desired standard. These defects can range from minor blemishes to major structural flaws and can be caused by a variety of factors. Understanding the causes of casting defects can help to prevent them from occurring in the future.
Porosity
One of the most common casting defects is porosity. This occurs when gas bubbles become trapped in the metal during the casting process, resulting in a porous or weak structure. Porosity is caused by a variety of factors, including improper mold design, inadequate venting, or the use of low-quality materials.
Shrinkage
Another common defect is shrinkage. This occurs when the molten metal does not fill the entire mold, resulting in a casting that is smaller than the desired size. Shrinkage is typically caused by inadequate pouring temperature, improper gating, or a lack of sufficient pressure during the casting process.
Surface Defects
Casting defects can also be caused by the presence of foreign objects in the mold. This can include sand, dirt, or other debris that is not removed prior to casting. If these objects are not removed, they can become embedded in the metal, resulting in casting with weak spots or other structural flaws.
Weak Structure
casting defects can also be caused by improper heat treatment. If the metal is not heated to the correct temperature or cooled at the right rate, it can result in a casting with a brittle or weak structure.
Casting defects can be prevented by following proper casting procedures and using high-quality materials. It is also important to inspect the casting for any defects prior to use, as this can help to identify any potential problems before they become major issues.
Who Does Metal Casting Inspection
Quality control inspections are done by experts and certified inspectors. It is done by a group of people since the inspection methods are multi-step processes. Every personnel in the process checks the work of each one to ensure quality.
Metal Parts That Fail on Inspections
Metals that fail inspections can lead to a variety of problems. Depending on the type of metal, the cause of the failure, and the severity of the failure, the consequences can range from minor inconveniences to major safety hazards.
When a metal fails an inspection, it means that the metal does not meet the standards set by the manufacturer or the governing body that regulates the product. This could be due to a variety of reasons, such as poor quality control, improper manufacturing processes, or inadequate materials.
In some cases, the metal may not be strong enough to withstand the intended use. This could lead to the metal breaking or cracking under pressure, which could cause serious injury or even death if the metal is used in a critical application. In other cases, the metal may be contaminated with hazardous substances. This could lead to the metal corroding or rusting, which could cause the metal to become brittle and weak. It may also lead to metal breaking or cracking, which could cause serious injury or even death if the metal is used in a critical application.
No matter the cause, metals that fail inspections can lead to serious consequences. It is important to ensure that all metals used in critical applications are inspected regularly to ensure that they meet the necessary standards. If the metal does not meet the standards, it should be replaced immediately to prevent any potential harm.


